12/9/09
Short blurb.
Not much to report for now. One overhead door finished in barn, Started putting insulation in. Decided I need to get that in before the ceiling framing. Today temps dropped big time and high winds, below zero with windchill tonight. Been dealing with heating issues all day at other locations. Next few days will be dicey. I did start back to work on my peg shaving horse. Will post a pic when finished. All for now. B.
11/2/09
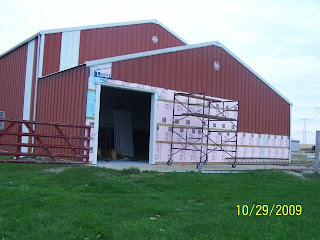
Here are some updated pics from this past week of my barn renovation. I had a bad cold that kept me at 50 percent power for a week and a half, but finally got back to work on it this last week. As you can see since last time I had finished housewrapping, and applying the nailer boards and infilling with 3/4 inch foam to fill the voids between. Now I have the original sheetmetal back on(my friend Ryan helped me get that up), and I reused some old used sheetmetal that was from one of the other pole barns. Luckily I had just enough to fill in what I needed. New sheet metal would have cost about $900. They charge a premium, I think because they know you can't get the same interlocking pattern anywhere else. That's why I opted to reuse old stuff that was left over from a repair long ago. I didn't want to spend $900! It's orange and one piece is beige. I plan to paint the sheet metal maroon next spring when it's warm enough, to match the rest of the building.



9/29/09

It's been pretty busy since my last post, but not a ton to show for it. I have made more progress on my barn renovation. You can see in the photo above that working by yourself, you have to be resourceful. I rigged up an A-frame and a rope to pull up the door framed wall section. It was quite tricky as the bottom had to be slid outside past the door way to clear the inside rafter truss. The bottom was kept from sliding out with anchored chains. Then I had to slide the bottom back inside a bit at a time. Since then I finished the outside sheathing in OSB, housewrapped the whole thing, and installed treated nailers for the sheetmetal. Lastly I filled betwenen the nailers with rigid foam to fill the spaces. I'll add a new post with that pic shortly after this one. I've started to put some of the sheetmetal on, but I'm stuck right now waiting for the door trim to be fabricated, which has to go on before the remaining sheetmetal.
Also, On Aug.22nd I helped with a barn raising in Wisconsin. Craig Roost was in charge of this project(big guy in the bottom photo). It was a hardworking, but enjoying and satisfying day. I was one of the few there with timber experience, but there were a lot of guys working hard and the comradery was a good time.



8/15/09
Pole Barn Rennovation
For the last month, my cousin and I have been rennovating the end of my shop polebarn. The end of this barn used to be used for cows, but we haven't had cows in probably 10 years now. It was open and I am enclosing it and insulating and heating it for heated storage. This will free up a bunch of my crowded shop space and give me room to be able to timberframe in the winter in my heated shop. You may notice that the new storage area has an epoxy floor. I have wanted to try out Rustoleum's garage floor epoxy system and this was a good opportunity. The concrete was in excellent condition and didn't have any oil due to it's past use. We've had a pretty cool summer here on the farm, except for the last week which has been quite warm. I lose my cousin as he goes back to school this week, so I'm going to have to install the overhead doors, ceiling joists and sheetmetal, insulation, lights and heater myself :(. Here are some before and during pics.


6/13/09
Timberframe Workshop #2
Last week I went out to Idaho for a weeklong timberframing workshop. This was my second timberframe workshop. This one taught square rule layout (my last class taught mill rule). Snap line square rule was also demonstrated, as well as French scribe, which I now understand. This will allow me to work with bowed timber, or twisted timber and make all the joints meet up nice and tight. The weather was in the 70's during the day, and down to lower 50's at night. The landscape could not have been more beautiful. Such huge trees there as well, nothing like Illinois. The instructor, Collin Beggs Timber Frames, was awesome. He is a good teacher and really knows his stuff. In 6 days, the 8 students of the class, most first timers, built this 12'x18' 2 story Doug Fir frame, which was actually bought by one of the students. It could be a cabin, a master bedroom addition, or part of a larger frame. I am now confident I have the knowledge and enough experience to build my house and workshop frame. Now to get a design finished so I can start...


5/10/09
Been busy
Well I'm long overdue for an update. I was laid off in mid February. I've been off work for 2.5 months now, and it's amazing how time flies. I will say that having the time off has had a positive effect on my projects. I had also started a workout routine about a month before being layed off and as of now I've lost a total of 40 pounds, which has also been conducive to my projects. So what have I been doing with my time? Well the highlights are:
1. I finished the restoration of my 55 Ford tractor finally and got the mower deck hooked up and mowed for the first time this week. A few minor bugs had to be worked out, but it was a pleasure driving a restored show condition tractor.
2. I fixed my truck finally. After two trips and two $400 bills from what was supposed to be a reputable shop, I still had the same problem with the truck that I took it in for. Not trusting the shop anymore (and they really didn't seem to care about their failures), I had parked the truck until I would have time. Well having time, I ordered a Haynes repair manual, checked the codes on the truck and diagnosed a failing fuel pump. Being a difficult job any way you put it, I chose to pull the bed off to get at the fuel pump which is in the tank. After a number of hours with a torch and an impact wrench, I got the bed off and replace the pump. Problem solved. Still considering pulling truck apart for a chassis restoration.


3. Built my mom a garden toolbox from white oak.
4. Completed Oak door jam reinforcements on the farmhouse where I live and reproduced new trim to match the original along with the shellac finish.
5. Pruned my vineyard and trimmed all trees on the farm and burnt all cuttings.
6. Made a timber wrench/lever to rotate heavy timbers when working on them, and made a commander(big timber hammer for bumping timbers into place).


7. Finally I bought 94 reclaimed Beech wood timbers that are 10"X10", 12 footers, and 16 footers. With transport, I got them for about $.95 a board foot. They came from a 100 year old wearhouse, 40 miles East of Indianapolis. No mortices or defects, virtually no nails, and most pretty straight with only slight crown. Only a handful have some twist. I cherry picked from what the guy had. I bought one semi-load compared to 4 other loads he sold. I am planning to sand them with a floor drum sander after the joinery is cut. The 16 footers weigh about 500 lbs each, and the 12 footers are about 375 lbs, hence the need for the timber strap wrench. With the exception of the sil timbers, and possibly some principal rafter timbers, I now have the majority of what I will need(famous last words) for my house and workshop frames.


Though I still have a handful of projects and chores on my personal tasklist that must be completed, I am anxious to get a design on paper for the workshop so that I can start that frame. Good news is that my cousin is out of school for the summer now and will start to help me next week. Our first task is to enclose the end of my present shop, previously used as the barn for animals, to create needed storage to free up workspace in my workshop.
1/12/09
A Little Organizing
 After a little clean up after Christmas, I was able to take some days to work in the shop. My cousin was even home from school and was bored at home so he came out and worked with me. We did some maintenance tasks and some shop cleanup. We waited for a good day that wasn't windy and put up 30 feet of gutter on one shed that had some down from ice and a windstorm. After that though, we started doing some projects. We built two roll around cabinets, one which the mini fridge would sit on, and one that would be a tool cart. The goal is always to minimize taking up floor space. The fridge cartdoes that by only occupying floorspace that the fridge once did. I used the bottom of the tool card to store my Dewalt planer, which was occupying floor space before, hence a net zero gain. The fridge cart needs drawers made and I'll use it to store hardware. The tool cart will have one drawer at the top, still giving clearance to get the planer in and out. The top of the tool card has 3 sided white oak rails, carpet cover, and you can see the framing square storage on the side. Two stainless japanese framing squares fit nicely in slots and are easy to get in and out, yet do not rattle. I'll definitly hang some items on the pegboard recessed sides soon.
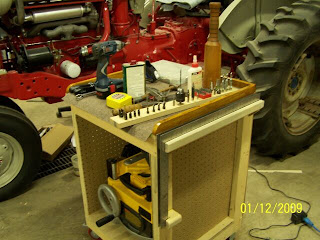
 The bit holder on top of the cart is meant for another cabinet or to go in the drawer.
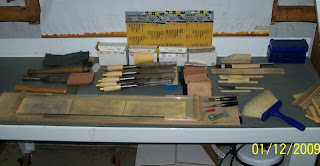
 Last winter I had made a sandpaper sharpening station. This station uses a piece of plate glass about 6"X36". Strips of pressure adhesive backed sandpaper are applied to the glass, and chisels are sharpened, starting with coarse grits and working to progressivley finer grits - 80, 150, 220, 400, 800, 1000, 1500 grit. With chisels that have been damaged, are not flat, or have now edge, most time is spent on the 80 grit, and less time is needed with each successive grit. After working with each grit, the tool is wiped off to preven contamination to the next grit. The paper used is also wisked with a brush or wisk broom to remove any metal or sandpaper dust and prevent clogging of the paper. My blue brush is one that was in the brick/mortar section of my local home center. Just have one that is stiff enough to brush out the paper. Once the first three grits have been worked through, finer paper is laid on top of those grits. These finer grits are NOT adhesively backed. they are held in place by the friction of the sanpaper base. These finer grits are automotive wet/dry paper that can be found in autobody stores or sometimes autoparts stores, and come in sheets that can be cut into 3 pieces. A razor blade holder(on the right of the station) is used to cut the adhesive backed paper to length and the fine grit paper if scissors are not handy. I use a red marker to color chisels and after lapping, I can easily see what has and has not been lapped flat by what marker has been removed. All of my framing chisels are antiques and are all TH. Witherby purchased off of ebay. Some were badly bent and were straightened by Jim Rogers partner in a forge. All of my chisel sheaths were purchased from Jim Rogers as well. My chisels are currently still being prepped with 80 grit but most are almost ready to move to the next grit. This sharpening station can be used for more than just chisels. I've used it to sharpen a hatchet, pruners, loppers, tune ships auger bits, and even sharpen the counter sink on countersing drill bits. Some of the small wood dowels and pieces of wood are used with the various grits of sandpaper to sharpen small or curved tool edges. This is a very effective sharpening method.
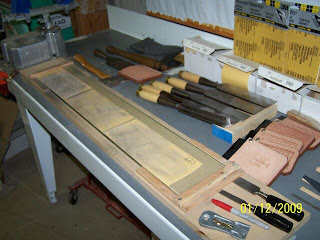
Chisels that are in good shape, you usually do not need to go back to 80 grit unless you damage or chip the tip or corner. a tuned chisel that is starting to dull just needs to be gone over from 400 to 1500. Exactly how coarse you start on depends on how it looks and your judgement.


If you've used your chisels when they are sharp and when they are not, you know the difference. You can shave and plane with a sharp chisel. You fight and cuss with one that is not., and you end up gouging when you don't want to.
Subscribe to:
Posts (Atom)


